Implementing FedCM Login in the oauth2-passkey Rust Library
FedCM (Federated Credential Management) is a W3C standard API that enables federated authentication through browser-native UI. Instead of popup windows or redirects, the browser itself displays an account chooser and communicates directly with the identity provider.
This article explains how FedCM works, how to implement it, the differences from the traditional OAuth2 Authorization Code Flow, and the security trade-offs involved.
What is FedCM?
FedCM (Federated Credential Management) is an API that performs federated authentication through browser-native UI. No popup windows, no redirects -- the browser itself displays the account chooser.
In the traditional OAuth2 flow, the RP (your app) redirects to Google's page, and after authentication, returns to a callback URL. With FedCM, you simply call navigator.credentials.get(), the browser communicates directly with Google, and returns a JWT ID token.
Traditional OAuth2 Authorization Code Flow:
  Button click -> Popup -> Google auth page
    -> Redirect (with authorization code)
    -> Backend exchanges code with Google (server-to-server)
    -> Obtain ID token -> Validate -> Establish session

FedCM:
  Button click -> navigator.credentials.get()
    -> Browser displays native UI account chooser
    -> Browser obtains JWT ID token directly from Google
    -> JS posts token to backend -> Validate -> Establish session
With FedCM, the browser acts as an intermediary, so JavaScript loaded from the RP cannot see the list of accounts. The browser uses Google's session cookies to display account information in the native UI, and only returns the user's selected result to JavaScript.
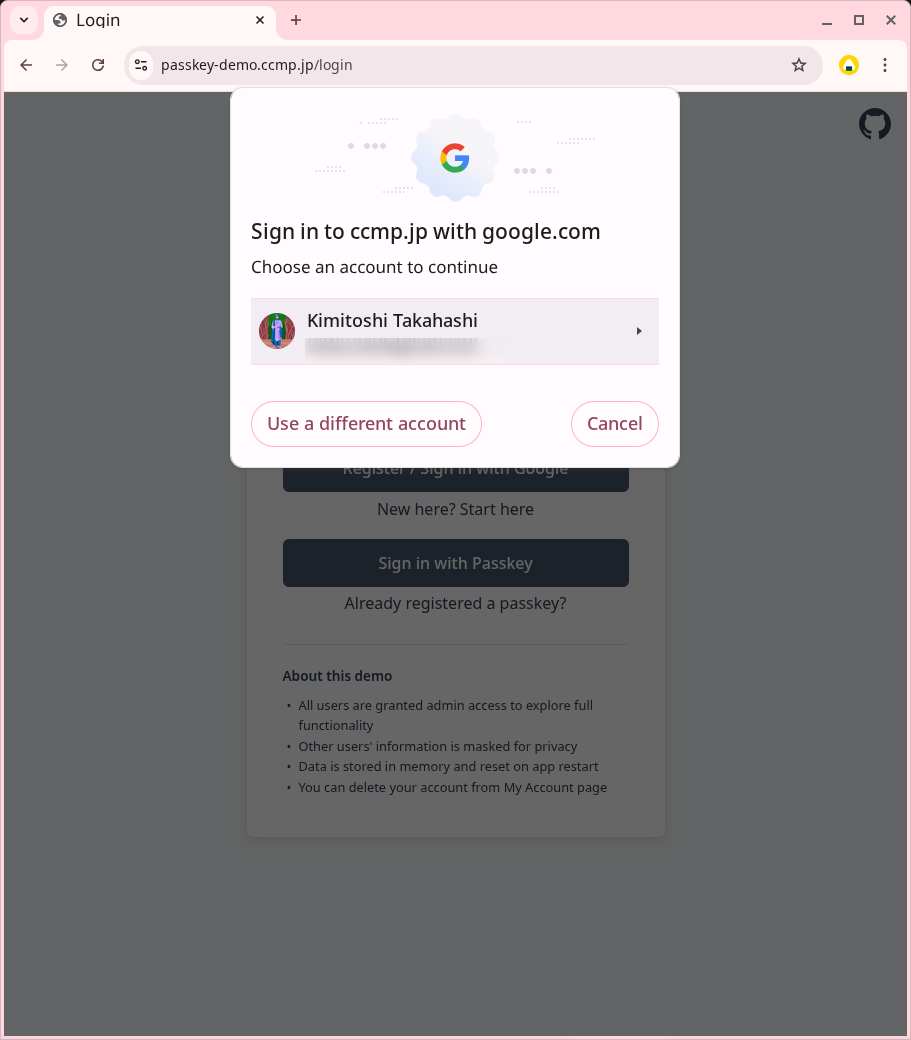
FedCM account chooser (browser displays native UI)
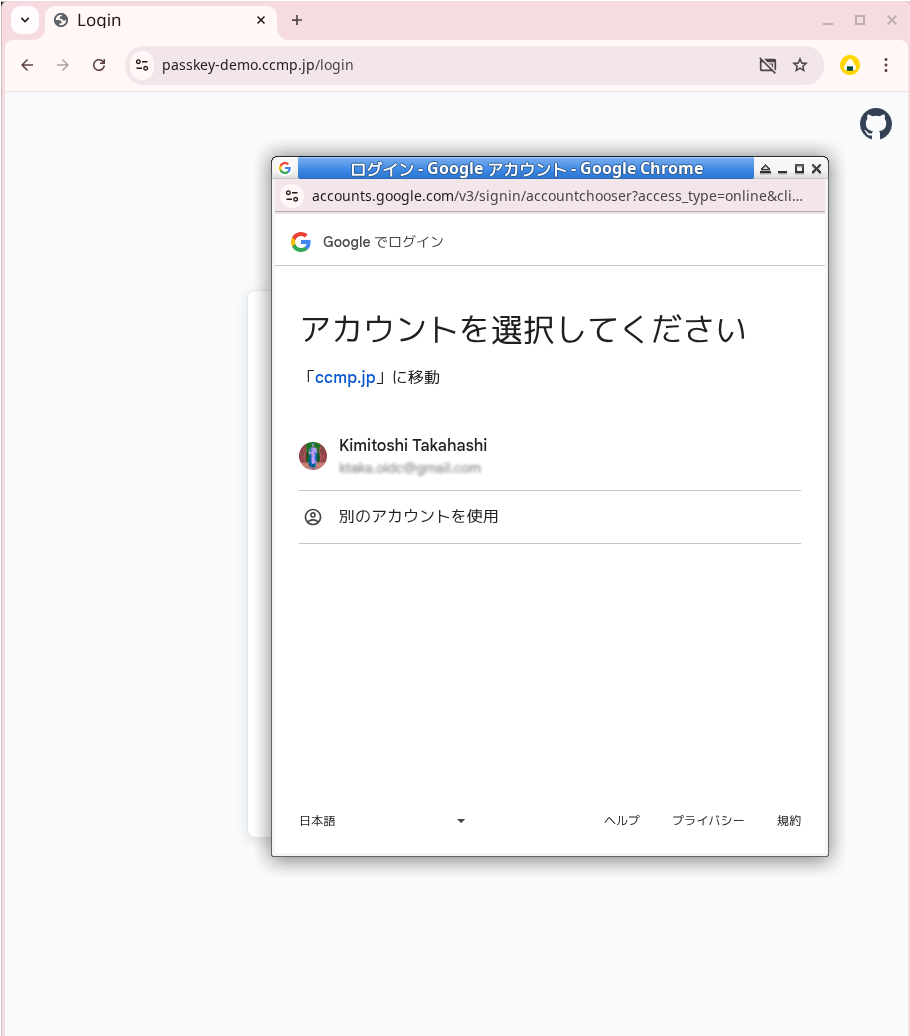
Traditional OAuth2 Authorization Code Flow (displays Google auth page in popup window)
Implementation Approach
FedCM is provided as a browser standard API (navigator.credentials.get()). Google recommends using it via the GIS SDK, but since it's a standard API, it can be called directly without the SDK.
The advantage of using the standard API directly is that it requires no library dependencies and makes the internal workings easier to understand. When you understand what's happening and how, troubleshooting becomes much easier.
This article explains how to handle FedCM directly as a standard API, using the implementation in oauth2-passkey as an example.
Frontend Implementation
The FedCM frontend implementation consists of four main steps.
1. Obtaining a Nonce
First, obtain a nonce from the server. This nonce is a single-use value to prevent replay attacks.
const nonceResponse = await fetch('/api/fedcm/nonce');
const nonceData = await nonceResponse.json();
// { nonce: "random string", nonce_id: "cache key" }
2. Calling navigator.credentials.get()
Use the obtained nonce to call the FedCM API.
const credential = await navigator.credentials.get({
    identity: {
        providers: [{
            configURL: 'https://accounts.google.com/gsi/fedcm.json',
            clientId: OAUTH2_CLIENT_ID,
            params: {
                nonce: nonceData.nonce,
                response_type: 'id_token',
                scope: 'email profile openid',
                ss_domain: window.location.origin,
            },
        }],
        mode: 'active',
        context: 'signin',
    },
    mediation: 'required',  // Prevent auto re-authn, always require user interaction
});
The configURL is the URL of Google's FedCM configuration file. The browser fetches this to discover the location of various endpoints. The response_type, scope, and ss_domain in the params object are Google-specific requirements not included in the W3C FedCM specification (discussed later). ss_domain contains the origin of the runtime environment (e.g., https://passkey-demo.ccmp.jp).
mode: 'active' is used when responding to a user button click. It's important that this is placed directly under the identity object.
mediation: 'required' is a parameter to prevent automatic re-authentication. With this setting, the browser always prompts the user to select an account.
3. Sending the Token to the Backend
Send the obtained ID token and nonce_id to the backend.
const response = await fetch('/api/fedcm/callback', {
    method: 'POST',
    headers: { 'Content-Type': 'application/json' },
    body: JSON.stringify({
        token: credential.token,
        nonce_id: nonceData.nonce_id
    })
});

if (response.ok) {
    // Login successful, session cookie set via Set-Cookie header
    window.location.reload();
}
The backend validates this ID token and establishes a session.
4. OAuth2 Fallback
function openPopup() {
    if (isFedCMAvailable()) {
        fedcmLogin().catch(function(err) {
            console.log('FedCM failed, falling back to OAuth2 popup:', err.message);
            openPopupOAuth2();
        });
        return;
    }
    openPopupOAuth2();
}
If FedCM fails (unsupported browser, user closes the dialog, error, etc.), the Promise's .catch() automatically initiates the traditional OAuth2 popup flow.
Backend Implementation
The backend processing consists of five main steps.
1. JWT Validation (signature, iss/aud/exp, nonce)
The ID token received from the frontend is in JWT format and requires signature validation and claim validation.
fn validate_fedcm_token(token: String, nonce_id: String) -> IdInfo {
    // JWT signature validation, aud/iss/exp validation
    let idinfo = verify_idtoken(token, CLIENT_ID);

    // Nonce validation (ensures single use)
    verify_and_consume_nonce(nonce_id, idinfo.nonce);

    idinfo
}
JWT validation verifies the following:
- Signature verification: Fetch Google's JWKS (public key set), select the key using the
kidin the JWT header, and verify the signature - Claim validation: Verify that
iss(issuer),aud(Client ID), andexp(expiration) are correct - Nonce validation: Verify that the
nonceclaim in the ID token matches the pre-generated value, then delete it from the cache after verification to prevent reuse
The JWT returned by Google's FedCM endpoint is in the same format as the ID token obtained through the Authorization Code Flow. This means existing OAuth2 authentication JWT validation code can be reused as-is.
2. Extracting User Information
Extract user information from the validated ID token.
let user_info = UserInfo {
    email: idinfo.email,
    name: idinfo.name,
    provider_user_id: idinfo.sub,  // Google user ID
};
The IdInfo contains email, name, sub (user ID within the provider), etc., which are extracted for use in subsequent processing.
3. Finding or Creating a User
Search for an account using the provider's user ID, and create a new one if it doesn't exist.
// Search for existing account by provider user ID
let existing_user = db.find_user_by_provider_id(user_info.provider_user_id);

let user_id = match existing_user {
    Some(user) => {
        // Log in with existing user
        user.id
    }
    None => {
        // Create new user
        let new_user = db.create_user(user_info.email, user_info.name);
        db.link_provider(new_user.id, user_info.provider_user_id);
        new_user.id
    }
};
If an existing user is found, use that user ID; if not, create a new one.
4. Creating a Session
Once the user ID is determined, create a session.
fn create_session(user_id: String) -> (String, Headers) {
    // Generate session ID and CSRF token
    let session_id = generate_random_string(32);
    let csrf_token = generate_random_string(32);
    let expires_at = now() + Duration::hours(1);

    // Store session in cache
    let session = Session {
        user_id,
        csrf_token,
        expires_at,
    };
    cache.store(session_id, session, ttl: 24h);

    // Create Set-Cookie header
    let headers = Headers::new();
    headers.set_cookie("session_id", session_id, expires_at);

    (session_id, headers)
}
The session ID is randomly generated and stored in a cache store (such as Redis). The CSRF token is also generated here and stored in association with the session.
5. Returning the Set-Cookie Header
Return the created session cookie to the browser as a Set-Cookie header.
// Return response
return Response {
    status: 200,
    headers: headers,  // Contains Set-Cookie header
    body: json!({ "success": true }),
};
The browser automatically sends this cookie with subsequent requests, maintaining the authenticated state.
Post-authentication user processing (account search/creation, session issuance, login history recording) uses functions common with OAuth2.
Security Considerations
FedCM brings UX improvements, but its security model differs from the traditional OAuth2/OIDC flow.
| Aspect | Authorization Code Flow + PKCE | FedCM |
|---|---|---|
| ID token acquisition | Server exchanges authorization code | Browser obtains directly |
| JavaScript-accessible information | Authorization code (worthless) | JWT ID token (usable for authentication) |
| XSS attack risk | Authorization code alone cannot authenticate | Usable for authentication within validity period |
In my understanding, OAuth2 + PKCE has higher resistance to XSS attacks. Note that Google's One Tap (GIS SDK) also adopts the same model.
(If you have different views or additional insights on the security evaluation, I'd appreciate hearing them)
Caveats When Calling FedCM API
The parameters in the JSON object passed to navigator.credentials.get() require the following considerations.
Google-Specific Required Fields
When using Google's FedCM endpoint, the following parameters are required within the params object.
| Field | Value | Description |
|---|---|---|
response_type | 'id_token' | Required for Google to return JWT |
scope | 'email profile openid' | Requested scopes |
ss_domain | window.location.origin | RP's origin |
mode: 'active' Placement
FedCM has active mode and passive mode. Active mode responds to user button operations, while passive mode automatically displays on page load.
When using active mode, mode: 'active' must be placed directly under the identity object. If placed inside the provider object, Chrome ignores it and operates in passive mode. No error is shown.
In passive mode, when a user closes the dialog, a cooldown occurs, preventing FedCM from being used for 2 hours to a maximum of 4 weeks. Active mode has no such cooldown. If the placement is wrong, FedCM becomes unusable for a long period just because the user closed the dialog once.
Other Considerations
JSON-wrapped JWT: Google's FedCM endpoint may return the JWT wrapped in JSON like {"token":"eyJ..."}. It's not a raw JWT string, so parsing is required.
Nonce params migration: Starting with Chrome 143, the nonce must be placed inside the params object rather than directly under the provider object. Chrome 145 removed support for the old format.
Browser Support
| Browser | Support |
|---|---|
| Chrome 108+ | Supported |
| Edge 108+ | Supported |
| Safari | Not supported (falls back to popup) |
| Firefox | Not supported (falls back to popup) |
Summary
What became clear through implementing FedCM:
- The FedCM frontend is a 3-step process: nonce acquisition →
navigator.credentials.get()→ POST to backend. Automatically falls back to OAuth2 popup on failure - The backend follows the flow: JWT validation → user info extraction → user search/creation → session creation → Set-Cookie. Existing JWT validation code can be reused as-is
- The security model differs from the Authorization Code Flow; OAuth2 + PKCE has higher resistance to XSS attacks. FedCM is a trade-off that prioritizes UX improvement
- Parameters for
navigator.credentials.get()have Google-specific requirements, and correct notation such asmode: 'active'placement is crucial
See oauth2-passkey for implementation examples. Try the actual behavior at the demo site.