Sign in with Google in HTMX+FastAPI
TL;DR
The “Sign in with Google” feature has been integrated into a sample HTMX+FastAPI web application. Either an HTML or JavaScript version of a code snippet from Google’s code generator is included in the HTML to display the button. The FastAPI backend has been configured to create a session from the JWT and set “Set-Cookie: session_id” in the header, enabling subsequent communications to maintain the login status through a session cookie. Thanks to HTMX functionality, the application page can dynamically fetch the navigation bar upon a change in login status, indicating whether the user is logged in.
Introduction
As an aspiring full-stack software developer, I’ve been teaching myself various front-end web technologies recently. These include React.js, Svelte, and other shiny new JavaScript frameworks, which can sometimes be overwhelming. I was considering settling on Svelte, thanks to its simplicity in state management, when I discovered a concept called Hypermedia as the Engine of Application State (HATEOAS) and a library named htmx.js.
Initially, I didn’t quite grasp how it differed from other technologies. However, after creating several web pages for practice, I realized I didn’t need to switch into a dedicated front-end programming mode. I felt liberated from the struggle of forcing myself into the React mental model, which always seemed nonsensical to me. I often questioned, ‘Why must I change my mental model every time I create a small piece of a web page?’
With htmx.js, I can simply create a page, and when I need to change parts of it, I just fire an AJAX request using hx-get and swap the DOM elements with HTML fragments in the response. I understand that as a web application becomes more complex, there might be situations where more feature-rich technologies are necessary. But now, I’m no longer intimidated by the overwhelming ecosystems of each technology.
Now, I wanted to explore how I could implement a login feature in a web application, specifically using the ‘Sign in with Google’ feature on a web page developed with HTMX and FastAPI. So, I did a bit of research and figured out how to do it. Noticing a lack of use cases on the web for this particular combination of technologies, I decided to share my findings.
While integrating the ‘Sign in with Google’ button into an HTMX page isn’t much different from incorporating it into a standard HTML page, the following aspects seemed particularly noteworthy:
-
How to display the status after a successful login or logout using HTMX.
-
The handling of the JWT after a successful login on Google’s side.
-
How to maintain a session via a cookie generated upon successful JWT verification, rather than solely relying on the JWT for session management.
These points are especially relevant for beginners like myself.
What I Implemented
The webpage I developed using FastAPI and HTMX is shown in the figure below. This page integrates a ‘Sign in with Google’ option, enhancing user experience and offering a secure login method.
The process begins when a user clicks on the Google logo. A pop-up window appears, guiding them through the Google account selection and authentication process, which is then executed seamlessly in the background.
After logging in, the webpage dynamically updates the navigation bar to include the user’s Google account icon. Additionally, menu elements like ‘Secret#1’ become accessible, revealing exclusive content with a single click.
Logging out is just as intuitive. Clicking the ‘Exit’ icon signs the user out, reverting the navigation bar to its default state for anonymous visitors.
The source code is available on my GitHub repo.
Anonymous User Page
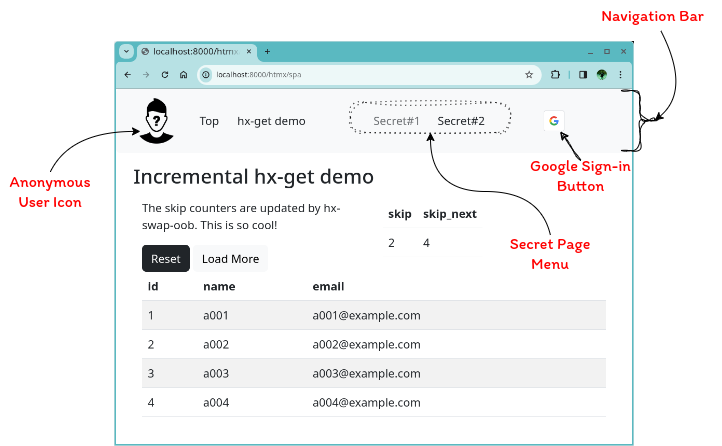
The figure below shows a screenshot of the anonymous user page, which will be explained in more detail. The page consists of a navigation bar and a content section. On the navigation bar, an anonymous user icon, menus including the ones to secret pages, and a Google Sign-in button are shown. In this example, the ‘Secret#1’ menu is disabled. The ‘Secret#2’ menu is not disabled; however, clicking it will return an access forbidden error.
The section below the navigation bar is the content section showing the “Incremental hx-get demo” page, which is accessible by both anonymous and authenticated users.
Authenticated User Page
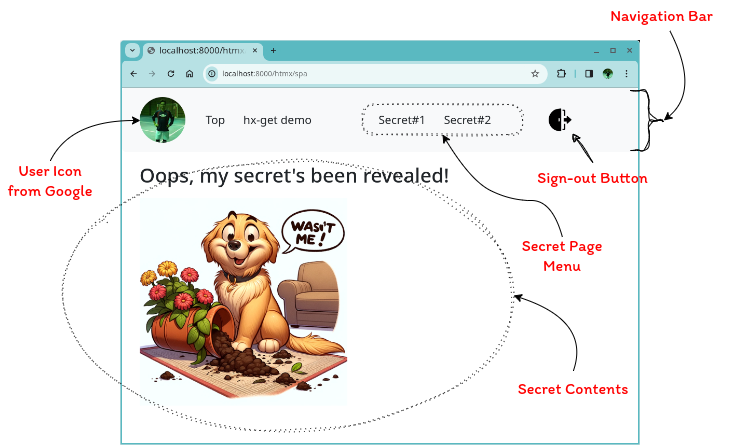
The figure below shows a screenshot of the authenticated user page, which also consists of a navigation bar and content section. Shown on the navigation bar are the user’s Google account icon, menus including the ones to secret pages, and a Sign-out button. When the user is authenticated, the menus to the secret pages are both accessible and return the contents.
The section below the navigation bar is the content section showing the content of the ‘Secret#1’ page, which is accessible only by authenticated users.
HTMX with FastAPI
FastAPI can respond with an HTML page generated from a Jinja
template. The following code specifies that when the FastAPI server
receives a GET request to /spa, it will respond with an
HTML page generated from the Jinja template spa.j2.
router = APIRouter()
templates = Jinja2Templates(directory='templates')

@router.get("/spa", response_class=HTMLResponse)
async def spa(request: Request):
    context = {"request": request}
    return templates.TemplateResponse("spa.j2", context)
Shown below is what the template spa.j2 looks like.
{% include 'head.j2' %}

  {# Header #}

  {# Content #}
In the body section, there are two sub-sections: one is wrapped by
<header></header>, and the other is wrapped by
<div></div>.
The section wrapped by <header></header>
loads the navigation bar in a responsive manner. Within this section, we
encounter unfamiliar attributes: hx-get, hx-target, hx-swap, and
hx-trigger. These attributes are interpreted by the HTMX JavaScript
library loaded in head.j2.
The meanings of the attributes are summarized as follows:
| Attribute | Description |
|---|---|
| hx-get | issues a GET request to the given URL |
| hx-target | specifies an element for swapping |
| hx-swap | specifies how content is swapped |
| hx-trigger | specifies the event that triggers the request |
In this case, the HTMX library will
issue a GET request to the /auth/auth_navbar endpoint upon
this section’s first load and when the page receives a response with
“HX-Trigger: LoginStatusChange” in the header for an HTMX AJAX request.
The HTMX library will then replace the content inside the
<div> section with id="auth_navbar".
The <div> section just below the
{# Content #} is there to load the main contents of the
page dynamically. It also has the same set of HTMX attributes summarized
in the table above. In this case, the HTMX library will issue a GET
request to the /htmx/content.top endpoint only upon this
section’s first load. The HTMX library will then replace the content
inside the <div> section with
id="content_section".
To have the HTMX attribute properly interpreted, we need to add a
<script> tag in the document head, like this:
The document head is included from the file head.j2 in
the same directory as:
{% include 'head.j2' %}These examples illustrate the basic usage of HTMX and FastAPI with Jinja templating.
Sign In
Overview
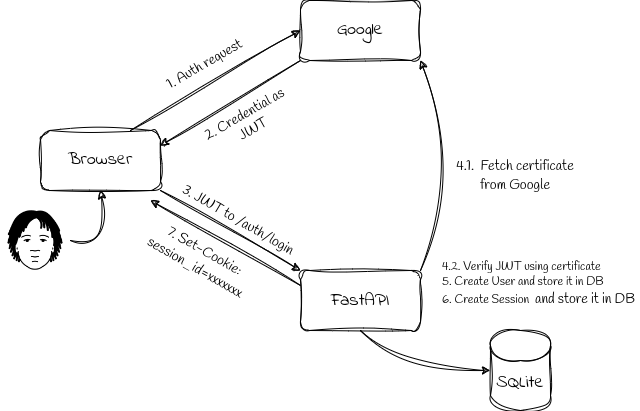
The figure below shows a schematic diagram depicting the flow of the authentication process.
-
When a user clicks ‘Sign in with Google’, an authentication request is sent to Google.
-
Upon successful authentication, the user’s credentials are returned as a JSON Web Token (JWT) to the page.
-
JavaScript code on the page forwards the JWT to
/auth/login, an authentication endpoint prepared using FastAPI. -
The JWT is then verified using a certificate fetched from Google.
-
A user corresponding to the JWT is created in the SQLite database, if one does not already exist.
-
A new session is also created and stored in the database.
-
FastAPI sends a response with a header containing the entry “Set-Cookie: session_id=xxxxxx.”
Thereafter, “Cookie: session_id=xxxxxx” is always set in subsequent communications, until the cookie expires or until the user explicitly hits the logout button on the web page.
Frontend Auth
Sign in with Google button
To display a Sign in with Google button, we need to use
a JavaScript library provided by Google and place a code snippet
somewhere in the HTML.
To load the JavaScript library, add the following
<script> tag in the document head:
Inside the navigation bar, we place a code snippet to show the “Sign in with Google” button. This code snippet is available in two versions: JavaScript and HTML. Either version can be used.
JavaScript Version
script>
    google.accounts.id.initialize({
        client_id: "{{ client_id }}",
        callback: onSignIn,
        ux_mode: "popup",
    });

    google.accounts.id.renderButton(document.getElementById("signInDiv"), {
        theme: "outline",
        size: "large",
        shape: "circle",
        type: "icon",
    });

    {# google.accounts.id.prompt(); #}

script>

div id="signInDiv">div>
The google.accounts.id.initialize function defines the
initialization and behavior of the sign-in process:
-
The
client_idspecifies the OAuth 2.0 Client ID, which is necessary. -
The
callbackdefines a JavaScript callback function for a successful sign-in on Google’s side. -
The
ux_modesets Google’s sign-in page mode, preferred to be ‘popup’ instead of ‘redirect’.
The google.accounts.id.renderButton function defines the
presentation style of the Sign in with Google button:
The google.accounts.id.prompt method displays the One
Tap prompt (and is disabled in this particular case).
HTML Version
 src="https://accounts.google.com/gsi/client" async>

 id="g_id_onload"
     data-client_id="{{ client_id }}",
     data-context="signin"
     data-ux_mode="popup"
     data-callback=onSignIn
     data-close_on_tap_outside="true"
     data-itp_support="true"
     data-auto_prompt="false"
     >

 class="g_id_signin"
     data-type="icon"
     data-shape="square"
     data-theme="outline"
     data-size="large"
     >
The <div id="g_id_onload"> element initializes and
configures the sign-in process:
-
data-client_id="{{ client_id }}"specifies the necessary OAuth 2.0 Client ID. -
data-ux_mode="popup"sets the mode of Google’s sign-in page to ‘popup’ instead of the more intrusive ‘redirect’. -
data-callback=onSignInspecifies a JavaScript callback function for a successful sign-in on Google’s side. -
Setting
data-auto_prompt="false"determines whether to display One Tap or not.
The <div id="g_id_sigin"> division defines the
presentation style of the Sign in with Google button.
The Callback Function
Below is an implementation of the callback function to forward the JWT to the backend:
script>
    function onSignIn(response) {
        htmx.ajax('POST', '{{ login_url }}',
            { values: { 'credential': response.credential }, swap: 'none' })
    }
script>
The onSignIn function sends the JWT received from
Google’s sign-in page to {{ login_url }}, a backend
endpoint designed to handle the received JWT.
Backend Auth
The backend endpoint receives the JWT, verifies it using Google’s public certificate, and then creates a session to maintain a logged-in status in subsequent communications.
Here is the code snippet of the backend endpoint, which performs the following operations:
-
VerifyToken: Verifies the JWT. -
GetOrCreateUser: Creates the user in the database if they don’t already exist. -
create_session: Creates a session and stores it in a session database. -
response.set_cookie: Sets the session_id in the cookie. -
Returns the response to the frontend.
@router.post("/login")
async def login(request: Request, ds: Session = Depends(get_db), cs: Session = Depends(get_cache)):

    body = await request.body()
    jwt = dict(urllib.parse.parse_qsl(body.decode('utf-8'))).get('credential')

    idinfo = await VerifyToken(jwt)
    if not idinfo:
        print("Error: Failed to validate JWT token")
        return  Response("Error: Failed to validate JWT token")

    user = await GetOrCreateUser(idinfo, ds)
    if not user:
        print("Error: Failed to GetOrCreateUser")
        return  Response("Error: Failed to GetOrCreateUser for the JWT")

    session_id = create_session(user, cs)
    if not session_id:
        print("Error: Failed to create session for", user.name)
        return  Response("Error: Failed to create session for"+user.name)

    max_age = 600
    expires = datetime.now(timezone.utc) + timedelta(seconds=max_age)

    response = JSONResponse({"Authenticated_as": user.name})
    response.set_cookie(
        key="session_id",
        value=session_id,
        httponly=True,
        samesite="lax",
        max_age=max_age,
        expires=expires,
    )
    response.headers["HX-Trigger"] = "LoginStatusChange"

    return response
Please note that there is a line setting “HX-Trigger: LoginStatusChange” in the response header. This triggers an hx-get to The VerifyToken function below verifies the JWT from the frontend using the Google OAuth2 Python library.
from google.oauth2 import id_token
from google.auth.transport import requests

async def VerifyToken(jwt: str):
    try:
        idinfo = id_token.verify_oauth2_token(
            jwt,
            requests.Request(),
            settings.google_oauth2_client_id)
    except ValueError:
        print("Error: Failed to validate JWT token with GOOGLE_OAUTH2_CLIENT_ID=" + settings.google_oauth2_client_id +".")
        return None

    print("idinfo: ", idinfo)
    return idinfo
Sign Out
Overview
The figure below shows a schematic diagram depicting the flow of the sign out process.
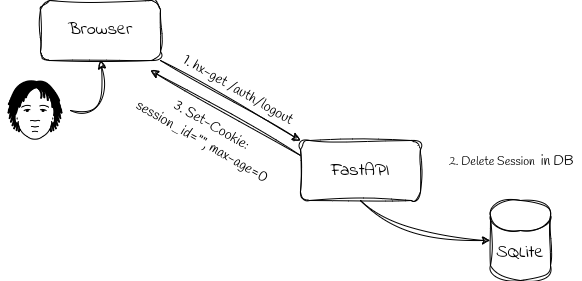
-
When a user clicks the ‘Sign-out’ button, an hx-get request is sent to /auth/logout, an endpoint prepared using FastAPI.
-
The session associated with the session_id is deleted in the database.
-
FastAPI sends a response with a header containing the entry
Set-Cookie: session_id="", max_age=0.
Thereafter, the browser unsets the session_id in the
Cookie header and will no longer send the session_id cookie
in subsequent requests.
Frontend
Here is a snippet of the Jinja template, which shows a logout button for authenticated users in the navigation bar.
             class="navbar-nav me-auto mb-2 mb-lg-0">
                 hx-get="{{logout_url}}" hx-trigger="click" hx-target="#content_section" hx-swap="innerHTML">
                     class="rounded-circle" src="{{icon_url}}" alt="logout" name="logout"
                        style="width:2rem;height:2rem;border-radius:2rem">
The {{ logout_url }} and {{icon_url}} will
returned to the client browsers.
Upon a click, the logout button fires an hx-get request to
{{ logout_url }}, which translates to
/auth/logout, an endpoint of the backend server. The
attributes hx-target="#content_section" and
hx-swap="innerHTML" will cause the HTMX libray to replace
the content in inside the
<div id="content_section"></div>.
Backend
The backend endpoint receives an AJAX get request, deletes the session associated with the session_id from the database, and instructs the browser to unset the ‘Cookie: session_id’.
Here is the code snippet of the backend endpoint, which performs the following operations:
-
delete_session: delete the session from the session database. -
response.delete_cookie: Causes the browser to delete thesession_idcookie from the Cookie header by settingSet-Cookie: session_id="", max-age=0in the response header(see explanation and source code).
@router.get("/logout", response_class=HTMLResponse)
async def logout(request: Request, response: Response, hx_request: Optional[str] = Header(None), cs: Session = Depends(get_cache)):
    if not hx_request:
        raise HTTPException(
            status_code=status.HTTP_400_BAD_REQUEST,
            detail="Only HX request is allowed to this end point."
            )

    req_session_id = request.cookies.get("session_id") # get session_id from cookie of request
    if req_session_id:
        delete_session(req_session_id, cs)
        response.delete_cookie("session_id") # delete key="session_id" from cookie of response

    context = {"request": request, "message": "User logged out"}
    response = templates.TemplateResponse("content.error.j2", context)
    response.headers["HX-Trigger"] = "LoginStatusChange"
    return response
Please also note that there is a line setting “HX-Trigger: LoginStatusChange” in the response header as same as the case for /auth/login endpoint. This triggers an hx-get to
Switch Navbar
The following code snippet returns the partial HTML content to
display the navigation bar. Depending on the existence of the valid
session_id in the Cookie header, the code returns the different HTMLs.
When there is a valid session_id in the Cookie header, it returns the
HTML generated from a Jinja template auth_navbar.logout.j2
for authenticated users with the user’s Google account icon and logout
button. When there isn’t a valid session_id in the Cookie header, it
returns the HTML generated from a Jinja template
auth_navbar.login.j2 for anonymous users with a “Sign in
with Google” button.
@router.get("/auth_navbar", response_class=HTMLResponse)
async def auth_navbar(request: Request, hx_request: Optional[str] = Header(None), ds: Session = Depends(get_db), cs: Session = Depends(get_cache)):

    if not hx_request:
        raise HTTPException(
            status_code=status.HTTP_400_BAD_REQUEST,
            detail="Only HX request is allowed to this end point."
            )

    # For authenticated users, return the menu.logout component.
    try:
        session_id = request.cookies.get("session_id")
        user = await get_current_user(session_id=session_id, cs=cs, ds=ds)
        logout_url = settings.origin_server + "/auth/logout"
        icon_url = settings.origin_server + "/img/logout.png"

        context = {"request": request, "session_id": session_id, "logout_url":logout_url, "icon_url": icon_url,
                   "name": user.name, "picture": user.picture, "email": user.email}
        return templates.TemplateResponse("auth_navbar.logout.j2", context)
    except:
        print("User not logged-in.")

    # For unauthenticated users, return the menu.login component.
    client_id = settings.google_oauth2_client_id
    login_url = settings.origin_server + "/auth/login"
    icon_url = settings.origin_server + "/img/icon.png"

    context = {"request": request, "client_id": client_id, "login_url": login_url, "icon_url": icon_url}
    return templates.TemplateResponse("auth_navbar.login.j2", context)
The settings.origin_server and
settings.google_oauth2_client_id are defined else where in
the code tree to provied necessary information from a .env
file.
Protecting Routes
Access to the secret pages is controlled through the
auth.is_authenticated dependency, as shown in the following
code snippet. If the auth.is_authenticated does not raise
an exception, it allows access to the routes defined in
htmx/htmx_secret.py; otherwise, it disallows it.
from htmx import htmx_secret

app = FastAPI()

app.include_router(
    htmx_secret.router,
    prefix="/htmx",
    tags=["htmx"],
    dependencies=[Depends(auth.is_authenticated)],
)
The auth.is_authenticated is defined as the
following:
-
In the function
get_current_user, the user’s email is retrieved from the session database, and then the other information is retrieved from the user database. -
The function
is_authenticatedraises an HTTPException when there is no user information returned by theget_current_useror theuser.disabledis true.
async def get_current_user(session_id: str, ds: Session = Depends(get_db), cs: Session = Depends(get_cache)):
    if not session_id:
        return None

    session = get_session_by_session_id(session_id, cs)
    if not session:
        return None

    user_dict = get_user_by_email(session["email"], ds)
    user=UserBase(**user_dict)

    return user

@router.get("/is_authenticated")
async def is_authenticated(session_id: Annotated[str | None, Cookie()] = None, ds: Session = Depends(get_db), cs: Session = Depends(get_cache)):
    user = await get_current_user(session_id=session_id, cs=cs, ds=ds)

    if not user:
        raise HTTPException(
            status_code=status.HTTP_401_UNAUTHORIZED,
            detail="NotAuthenticated"
        )
    elif user.disabled:
        raise HTTPException(
            status_code=status.HTTP_403_FORBIDDEN,
            detail="Disabled user"
        )
    else:
        print("Authenticated.")
        return JSONResponse({"message": "Authenticated"})
Conclusion
In this post, I’ve shared what I learned about integrating the Sign in with Google feature with an HTMX+FastAPI web application. The “Sign in with Google” button has been successfully integrated into a sample HTMX+FastAPI web application. We included either an HTML or JavaScript version of a code snippet from Google’s code generator in the HTML to display the button. The FastAPI backend has been configured to create a session from the JWT and set “Set-Cookie: session_id” in the header, allowing subsequent communications to maintain the login status through a session cookie. Thanks to HTMX functionality, the application page can dynamically update the navigation bar upon a change in login status, clearly indicating whether the user is logged in.
Seeking Oppotunities
I’m based in Japan and am seeking remote work opportunities overseas. I’m also open to on-site positions in North America, Australia, the EU, etc., if visa support is available. LinkedIn